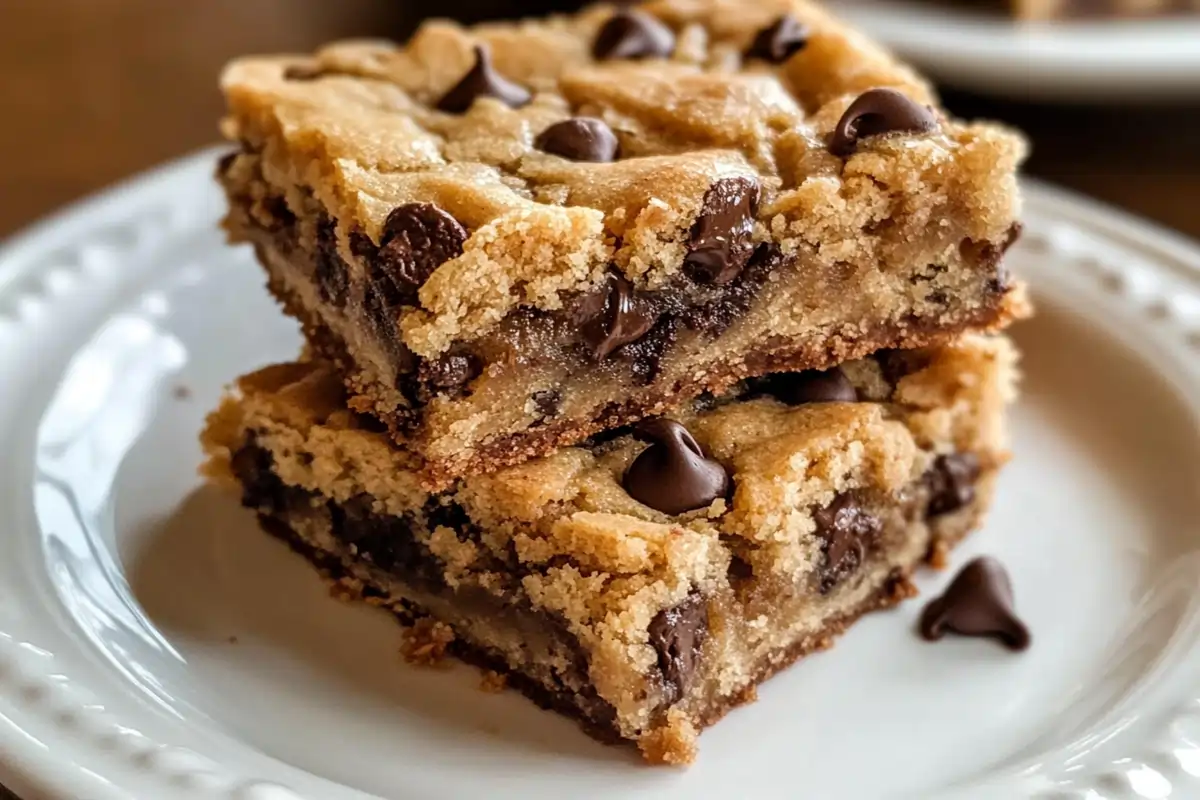
Who doesn’t love the classic taste of chocolate chip cookies? Now, imagine that same rich, buttery flavor and gooey chocolate in an easy-to-make bar form. Chocolate chip cookie bars take all the best parts of traditional cookies and make them even simpler, no scooping, no chilling, just mix, bake, and enjoy.
These bars have become a staple in home baking, loved for their chewy texture and simple preparation. They are a popular choice for bake sales, potlucks, and family desserts because they are easy to cut, serve, and store. Whether enjoyed warm with a glass of milk or packed as a sweet treat for later, chocolate chip cookie bars never disappoint.
In this article, we’ll explore everything you need to know about chocolate chip cookie bars, from their history and key ingredients to baking tips, variations, and storage methods. Get ready to bake the perfect batch!
Table of Contents
The Evolution of Chocolate Chip Cookie Bars
Origins of Chocolate Chip Cookies
Chocolate chip cookie bars began with the invention of chocolate chip cookies in the 1930s. Ruth Wakefield, owner of the Toll House Inn, accidentally created the first chocolate chip cookie when she added chopped chocolate to her dough. Instead of melting, the chocolate pieces stayed intact, leading to one of the most popular cookies in baking history.
As baking trends changed, home bakers sought easier ways to make cookies in large batches. Instead of scooping out dough, they began pressing it into a pan and baking it as a whole sheet. This method saved time and created a chewy, chocolate-filled dessert, giving rise to chocolate chip cookie bars.
Chocolate Chip Cookie Bars
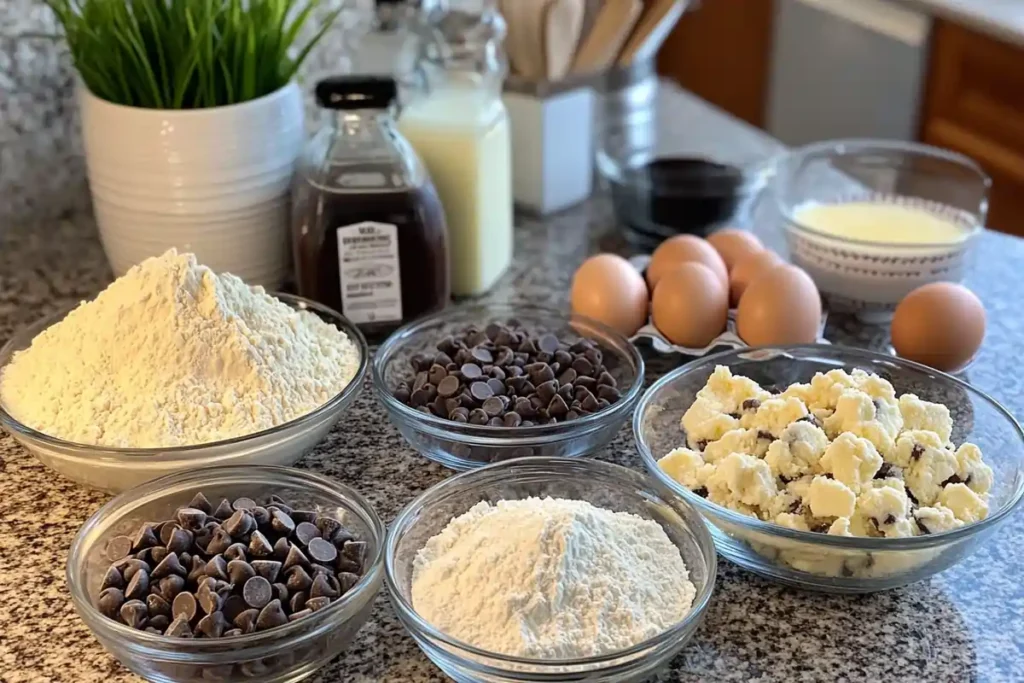
Ingredients
- 2 ¼ cups all-purpose flour
- 1 teaspoon baking soda
- ½ teaspoon salt
- 1 cup 2 sticks unsalted butter, softened
- ¾ cup granulated sugar
- ¾ cup brown sugar packed
- 2 large eggs
- 2 teaspoons vanilla extract
- 2 cups Nestlé Toll House semi-sweet chocolate chips
- 1 cup chopped nuts optional
Instructions
- Preheat the oven to 350°F (175°C) and grease or line a 9×13-inch baking pan with parchment paper.
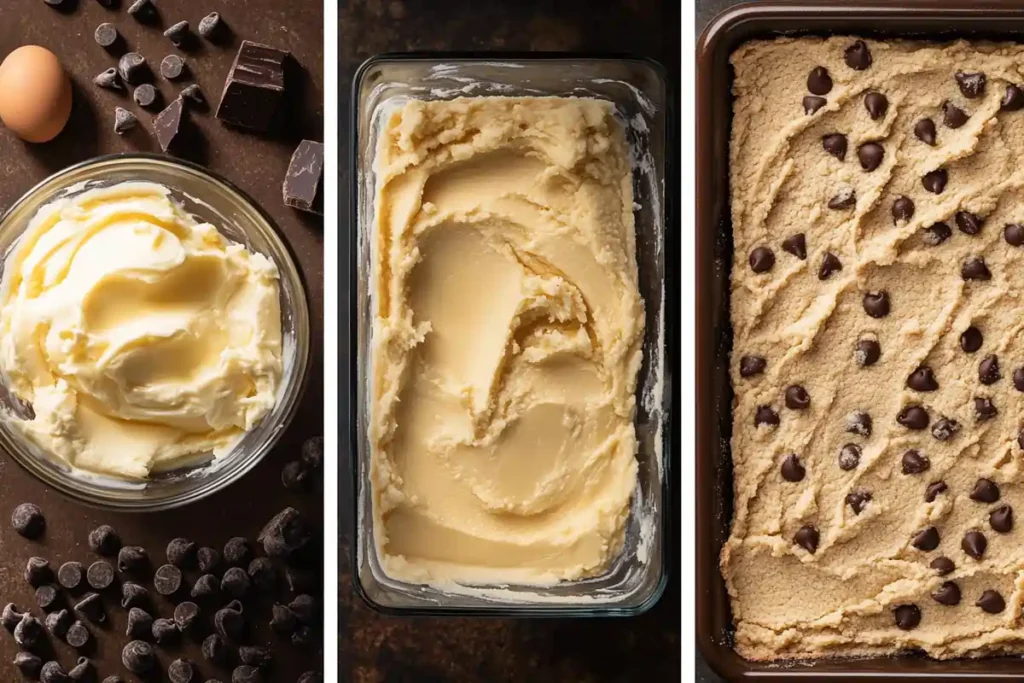
- Whisk dry ingredients – In a medium bowl, whisk together flour, baking soda, and salt.
- Cream butter and sugars – In a large bowl, beat butter, granulated sugar, and brown sugar until light and fluffy.
- Add eggs and vanilla – Mix in eggs and vanilla extract until well combined.
- Combine wet and dry ingredients – Gradually add the flour mixture, stirring until just combined.
- Fold in chocolate chips and nuts – Gently mix in chocolate chips and nuts (if using).
- Spread the dough evenly into the prepared baking pan.
- Bake for 25–30 minutes, or until the edges are golden brown and a toothpick inserted in the center comes out with a few moist crumbs.
- Cool completely in the pan before cutting into bars.
Notes
- For chewier bars, bake for 25 minutes. For crispier bars, bake closer to 30 minutes.
- Store bars in an airtight container at room temperature for up to 4 days or freeze for up to 3 months.
- Try using dark chocolate, white chocolate, or a mix for a unique flavor.
- For a gluten-free version, substitute all-purpose flour with a 1:1 gluten-free baking flour blend.
Rise in Popularity
By the mid-20th century, chocolate chip cookie bars had become a staple in home baking. Their simplicity made them a go-to treat for families, school lunches, and bake sales. Brands like Nestlé helped spread the recipe by printing it on chocolate chip packaging, making it easy for anyone to bake at home.
Modern Variations
Today, bakers experiment with different chocolates, adding dark, milk, or white chocolate chips for variety. Many also include nuts, caramel, or peanut butter for extra flavor. Dietary adaptations have made these bars accessible to more people, with gluten-free, vegan, and lower-sugar versions becoming popular.
Despite new twists, chocolate chip cookie bars remain a favorite! easy to make, delicious, and perfect for any occasion.
Essential Ingredients and Their Roles
Core Ingredients
- Flour, baking soda, and salt: flour provides structure, baking soda helps the bars rise and stay soft, and salt enhances flavor by balancing sweetness.
- Butter, granulated sugar, and brown sugar: butter adds richness and moisture. Granulated sugar helps create crisp edges, while brown sugar keeps the bars chewy and gives a slight caramel flavor. Vanilla extract adds depth to the flavor, giving the bars a warm, homemade taste.
Chocolate Choices
- Semi-sweet chocolate chips: the most common choice, offering a balanced sweetness.
- Dark chocolate chips: provide a deeper, richer flavor with less sweetness.
- Milk chocolate chips: sweeter and creamier, perfect for those who prefer a milder chocolate taste.
- White chocolate chips: Add a creamy sweetness that pairs well with nuts or dried fruit.
- Impact of cocoa content: Higher cocoa content results in a more intense chocolate flavor, while lower cocoa content makes the bars sweeter and creamier.
Optional Additions
- Nuts—walnuts, pecans, or almonds add crunch and enhance flavor.
- Dried fruits—raisins, cranberries, or chopped dates—bring a chewy texture and natural sweetness.
- Spices and flavor enhancers: cinnamon, espresso powder, or sea salt can add depth and complexity to the bars.
Using high-quality ingredients and experimenting with different mix-ins allows you to customize your chocolate chip cookie bars to match your taste!
If you love the rich, chocolatey goodness of chocolate chip cookie bars, you might also enjoy these Cookie Brownies. They combine the best of both worlds, chewy cookies and fudgy brownies—for an indulgent treat that’s perfect for any occasion.
Step-by-Step Baking Instructions
Follow these easy steps to make perfect chocolate chip cookie bars with a soft, chewy texture and rich chocolate flavor.
Preparation
- Gather Tools & Ingredients: You’ll need a mixing bowl, whisk, spatula, measuring cups, and a 9×13-inch baking pan.
- Preheat the oven: Set it to 350°F (175°C) to ensure even baking.
- Prepare the baking pan: Line it with parchment paper or grease it lightly with butter to prevent sticking.
Making the Dough
- Cream Butter & Sugars: In a large bowl, beat softened butter, granulated sugar, and brown sugar until light and fluffy. This creates a smooth, creamy base.
- Add Eggs & Vanilla: Mix in eggs and vanilla extract until fully combined. This adds moisture and enhances flavor.
- Incorporate Dry Ingredients: In a separate bowl, whisk together flour, baking soda, and salt. Slowly add to the wet ingredients, mixing until just combined. Avoid overmixing to keep the bars soft.
- Fold in Chocolate Chips & Mix-ins Gently stir in chocolate chips and any optional add-ins like nuts or dried fruit.
Baking Process
- Spread Dough Evenly: Use a spatula to press the dough evenly into the prepared baking pan.
- Bake the bars: Place in the oven and bake for 25–30 minutes at 350°F (175°C).
- Test for doneness: The edges should be golden brown, and a toothpick inserted in the center should come out with a few moist crumbs. Avoid overbaking to keep the bars chewy.
Cooling and Serving
- Cool in the Pan: Let the bars cool for 15–20 minutes before transferring them to a wire rack. This helps them set properly.
- Cut into bars: Once completely cool, slice into squares or rectangles with a sharp knife.
- Serve & Enjoy: Eat them warm for a gooey chocolate experience, or pair them with milk, coffee, or ice cream for an extra treat!
Now, enjoy your homemade chocolate chip cookie bars, a simple and delicious dessert perfect for any occasion! 🍪✨
Looking to take your cookie bars to the next level? Try making brookies! This guide on how to make brookies with brownie mix and cookie dough will show you how to create a delicious mash-up of brownies and cookies in one bite.
Why Chocolate Chip Cookie Bars Are My Favorite Easy Dessert
The first time I made chocolate chip cookie bars, I was amazed at how easy they were compared to regular cookies. No scooping, no waiting—just mix, spread, and bake! I brought a batch to a family gathering, and they disappeared within minutes. The buttery, chewy texture with melty chocolate made them an instant favorite. Now, they’re my go-to dessert for parties and lazy weekends. If you love classic cookies but want something simpler, these bars are a must-try!
Tips, Tricks, and Variations
Customize your chocolate chip cookie bars with these easy tips. Whether you want them extra chewy, rich in flavor, or adjusted for dietary needs, these tricks will help you create the perfect batch every time.
Achieving Desired Texture
- For soft and chewy bars, bake for 25 minutes and let them cool completely in the pan. The residual heat will continue to set the bars without drying them out. Using more brown sugar than granulated sugar also helps retain moisture.
- For firmer and crispier bars, bake for 30 minutes or until the edges turn deep golden brown. Adding an extra tablespoon of butter can also create a slightly crispier texture.
- Proper storage keeps bars fresh. Store them in an airtight container at room temperature for up to 4 days. For extended storage, wrap each bar in plastic wrap and freeze for up to 3 months. To enjoy frozen bars, thaw at room temperature or warm them in the microwave for 15 seconds.
Flavor Enhancements
- Enhance the flavor with spices. Adding a teaspoon of cinnamon brings warmth, while espresso powder deepens the chocolate flavor without overpowering it.
- Create a sweet-salty balance. Drizzling caramel sauce or sprinkling flaky sea salt on top after baking adds extra depth and contrast.
- Experiment with different chocolate types. Try dark chocolate chips for a rich taste, milk chocolate for extra sweetness, or white chocolate for a creamy contrast.
Dietary Modifications
- For a vegan version, replace butter with vegan butter and substitute eggs with flax eggs (1 tablespoon flaxseed meal mixed with 3 tablespoons water per egg). Use dairy-free chocolate chips to keep the recipe fully plant-based.
- For gluten-free bars, swap all-purpose flour with a gluten-free 1:1 baking flour blend. Make sure all other ingredients, including baking soda and chocolate chips, are certified gluten-free.
- To reduce sugar, use coconut sugar, maple syrup, or a sugar alternative like monk fruit sweetener. These substitutes keep the bars sweet without spiking blood sugar levels.
By making small adjustments, you can enjoy chocolate chip cookie bars exactly the way you like them, chewy or crispy, classic or creative, indulgent or diet-friendly!
Frequently Asked Questions (FAQs)
Can I use margarine instead of butter?
Yes, but it will change the texture and flavor. Butter provides a rich, creamy taste and helps create a soft, chewy texture. Margarine has a higher water content, which can make the bars softer but may also result in a greasy or slightly spongy texture. If using margarine, choose one with at least 80% fat content for better results.
How should I store the cookie bars?
To keep cookie bars fresh, store them in an airtight container at room temperature for up to 4 days. If storing for a longer period, keep them in the refrigerator for up to a week.. For the best texture, let refrigerated bars come to room temperature before eating, or microwave them for 10–15 seconds to soften.
Can I freeze the dough or baked bars?
Yes, both the dough and baked bars freeze well. To freeze the dough, press it into a pan, wrap it tightly, and freeze for up to 3 months. Thaw in the fridge overnight before baking. For baked bars, wrap individual pieces in plastic wrap and freeze for up to 3 months. Thaw at room temperature or microwave for a quick treat.
What causes cookie bars to be too crumbly or too dense?
Crumbly bars usually result from too much flour or overbaking. Dense bars may be caused by too little leavening or overmixing the dough. Measure ingredients carefully and mix only until just combined to achieve the perfect texture.
Bake, Enjoy, and Share Your Cookie Bar Creations
Chocolate chip cookie bars are a simple, delicious treat that anyone can make. With their chewy texture, rich chocolate flavor, and easy preparation, they’re perfect for any occasion. Whether you follow the classic recipe or try your own variations, these bars are sure to be a hit.
Give this recipe a try and enjoy the warm, homemade goodness. We’d love to hear how your cookie bars turned out! Share your experience in the comments, let us know any twists you added, and tag us on social media with your creations. Happy baking!
you’ll also love